Beginner’s Guide to Google Spreadsheet Using Java
Google Spreadsheets, a very handy tool to access and maintain your data. In the present time, spreadsheets have become an essential business tool. It can be used for many reasons, but collaboration and accounting are the top of them. Often things can become easier and time saviour for you if you get ability to update spreadsheets automatically in real-time. With the help of a little programming, you can do it easily, you can create your own code that can update the google spreadsheet on behalf of you. For this purpose, Google provides API for spreadsheet and supports many different languages like Python, .NET, PHP, Node.js, Ruby, but in this article, we will limit our discussion to Java.
Things you need before getting started
- Google account.
- JDK installed on your system.
- A google spreadsheet.
If you are prepared with these three things, let's do the action part. We will break the entire process in small steps and proceed with simple explanations for each part.
Enable the Google Sheets API
Google has provided a platform where you can manage and use multiple APIs provided by Google itself, it is called Google API console. Here you can create projects for free and manage them with good analytics tools. For our purpose, we need to use Google Sheets API. To use Google sheets API you first have to enable it by
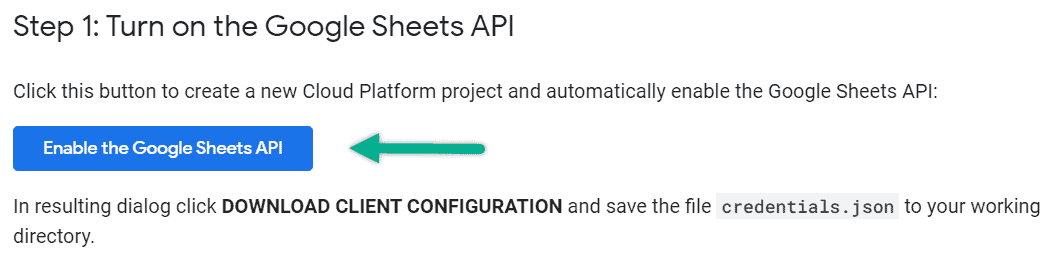
- First, visit the following link
Enable Sheets API. - Here you will see a button with tag "Enable the Google Sheets API", just click on it. After the button is clicked you will see this popup.
- Enter a name for your project and click on Next button.

- After this you will see a dropdown in which you have to select the open authentication client, it means that through which you are using Google Sheets API.

- For example, you are accessing the spreadsheet through your desktop app then you can choose an option for the desktop app there. Now click on CREATE Button and you are all set to go.

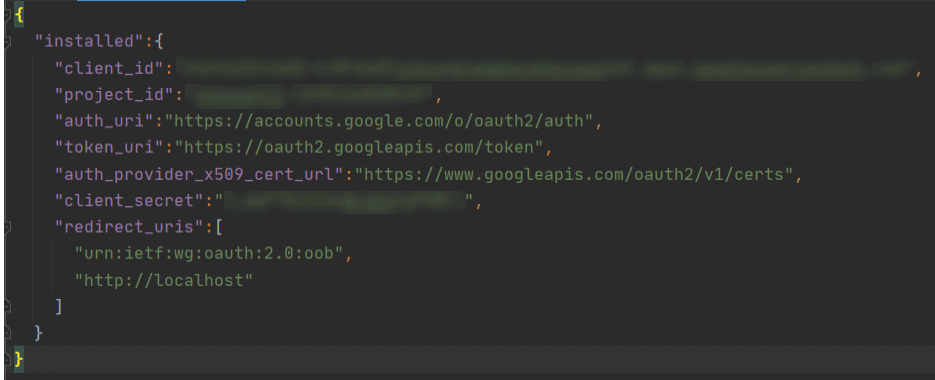
- Finally, click on the DOWNLOAD CLIENT CONFIGURATION and a JSON file will be downloaded with the name "Credentials.json".
- Save this file in your src/main/resources directory. This file contains authentication tokens that you will need to make communication with the Google Spreadsheet API. The file will look like this.
Download the Maven Dependencies
If you are a beginner and not familiar with Maven dependencies then don't stress yourself, you don't need a very deep understanding of Maven for this discussion. Just create pom.xml file and paste the following code into it.
<dependency>
    <groupId>com.google.api-client</groupId>
    <artifactId>google-api-client</artifactId>
    <version>1.30.4</version>
</dependency>
<dependency>
    <groupId>com.google.oauth-client</groupId>
    <artifactId>google-oauth-client-jetty</artifactId>
    <version>1.30.4
 </version>
</dependency>
<dependency>
    <groupId>com.google.apis</groupId>
    <artifactId>google-api-services-sheets</artifactId>
    <version>v4-rev581-1.25.0</version>
</dependency>
Connect to the Spreadsheet
Now you are in a situation, where you have a Spreadsheet and credentials (your authentication tokens) for your Spreadsheet API. Your program will use these credentials to authenticate every time it accesses the Spreadsheet. We just need to create a connection between the program and the spreadsheet.
Below are the packages that need to be imported into your JAVA program.
 import com.google.api.client.auth.oauth2.Credential;
 import com.google.api.client.extensions.java6.auth.oauth2.AuthorizationCodeInstalledApp;
 import com.google.api.client.extensions.jetty.auth.oauth2.LocalServerReceiver;
 import com.google.api.client.googleapis.auth.oauth2.GoogleAuthorizationCodeFlow;
 import com.google.api.client.googleapis.auth.oauth2.GoogleClientSecrets;
 import com.google.api.client.googleapis.javanet.GoogleNetHttpTransport;
 import com.google.api.client.http.javanet.NetHttpTransport;
 import com.google.api.client.json.JsonFactory;
 import com.google.api.client.json.jackson2.JacksonFactory;
 import com.google.api.client.util.store.FileDataStoreFactory;

 import com.google.api.services.sheets.v4.SheetsScopes;
 import com.google.api.services.sheets.v4.model.AppendValuesResponse;
 import com.google.api.services.sheets.v4.model.ValueRange;

 import java.io.*;
 import java.security.GeneralSecurityException;
 import java.util.*;
After importing the required packages, the next step is to create a class and write the following code into it.
public class SheetBot{
    private static final String APPLICATION_NAME = "Your Application Name";
    private static final JsonFactory JSON_FACTORY = JacksonFactory.getDefaultInstance();
    /**
     *tokens directory will be created in your project when you will run this code first time.
     *you will find a file named StoredCredential, in this directory
    private static final String TOKENS_DIRECTORY_PATH = "tokens";


    /**
     * Value of this SCOPES variable will decide the reading and writing rights of your bot.
     * Currently SPREADSHEETS_READONLY attribute is choosen which mean that our code can only read values from the spreadsheet.
     * For writing rights just use SPREADSHEETS in place of SPREADSHEETS_READONLY.
     */
    private static final List<String> SCOPES = Collections.singletonList(SheetsScopes.SPREADSHEETS_READONLY);

    // This variable is storing the path to your credentials.json file.
    private static final String CREDENTIALS_FILE_PATH = "/credentials.json";

    /**
     * The below code will generate a credential object.
     */
    private static Credential getCredentials(final NetHttpTransport HTTP_TRANSPORT) throws IOException {
        // Load client secrets.
        InputStream in = SheetBot.class.getResourceAsStream(CREDENTIALS_FILE_PATH);
        if (in == null) {
            throw new FileNotFoundException("Resource not found: " + CREDENTIALS_FILE_PATH);
        }
        GoogleClientSecrets clientSecrets = GoogleClientSecrets.load(JSON_FACTORY, new InputStreamReader(in));

        // Build flow and trigger user authorization request.
        GoogleAuthorizationCodeFlow flow = new GoogleAuthorizationCodeFlow.Builder(
                HTTP_TRANSPORT, JSON_FACTORY, clientSecrets, SCOPES)
                .setDataStoreFactory(new FileDataStoreFactory(new java.io.File(TOKENS_DIRECTORY_PATH)))
                .setAccessType("offline")
                .build();
        LocalServerReceiver receiver = new LocalServerReceiver.Builder().setPort(8888).build();
        return new AuthorizationCodeInstalledApp(flow, receiver).authorize("user");
    }

     public static void main(String... args) throws IOException, GeneralSecurityException {
        // Build a new authorized API client service.
        final NetHttpTransport HTTP_TRANSPORT = GoogleNetHttpTransport.newTrustedTransport();


        Sheets service = new Sheets.Builder(HTTP_TRANSPORT, JSON_FACTORY, getCredentials(HTTP_TRANSPORT))
                .setApplicationName(APPLICATION_NAME)
                .build();

    }
}
The above part of the code will be used to connect your code to the Google Sheet API.
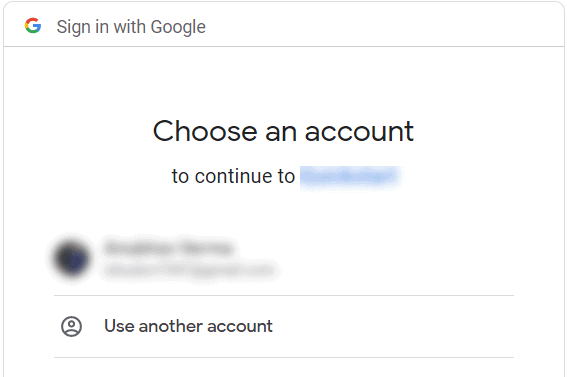
When you run this code for the first time, you will be redirected to the permissions page, where you must select your preferred google account which will be used to access the spreadsheet.
Once you select the account, you will be asked to grant the permissions to your application to reading and writing data on your Spreadsheet. This is a one-time job that you must do when you run your code the very first time. If you want to change these settings, then you must delete the StoredCredential file from the tokens directory that was automatically created in your project when you executed this code for the first time.
Reading Data from the Spreadsheet
Once your application is authorized then it can be used to access the spreadsheet, below code can be used to read data from the google spreadsheet. You can do this in two different ways.
Reading within a single range
By range I mean, the part of the sheet you want to cover for reading the data. For this, you must store your range in a string variable. The syntax for defining the range will be Sheet Name ! from cell: to cell
/*
     * For a URL like this https://docs.google.com/spreadsheets/d/1BxiMVs0XRA5nFMdKvBdBZjgmUUqptlbs74OgvE2upms/edit
     * You must put "1BxiMVs0XRA5nFMdKvBdBZjgmUUqptlbs74OgvE2upms" in the spreadsheetId variable
     */
     final String spreadsheetId = "1BxiMVs0XRA5nFMdKvBdBZjgmUUqptlbs74OgvE2upms";

     // Now you must define the range in which you want your application to read the data
     final String range = "Sheet1!A3:A30";
     ValueRange result = service.spreadsheets().values().get(spreadsheetId, range).execute();
     System.out.println(result);
Reading within Multiple Ranges
If you like to read data from multiple ranges in your sheet, then you must store those ranges in an array list.
List<String> ranges = Arrays.asList(
        //Range names ...
   );
   BatchGetValuesResponse result = service.spreadsheets().values().batchGet(spreadsheetId)
        .setRanges(ranges).execute();
Writing Data on the SpreadSheet
- Before start writing, do not forget to replace the
SPREADSHEETS_READONLYvariable toSPREADSHEETSin your code. - Now, delete the StoredCredentials file from tokens directory and run the code, this time you will be asked to grant editing rights too.
- Writing data is also as simple as reading data, but before starting the coding part we must understand the two different ways to send data to the sheet. For choosing this
- USER_ENTERED: Suppose you want to write a formula into a cell then you can use this parameter in your code.
- RAW: In some cases, you just want to write a mathematical expression in a cell and you don't want it to be used as a cell formula then you should use this parameter. For example, you want to write
=k2+j2.
Writing to a single range
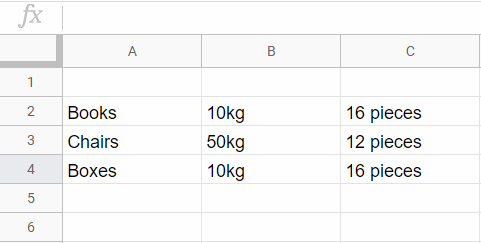
For writing to a single range, you must store cell values into a List object of a List type. Each list in this List object is a row of your spreadsheet and items in those lists are cells.
List<List<Object>> values = Arrays.asList(
        Arrays.asList("Books", "10kg", "16 pieces"),
        Arrays.asList("Chairs", "50kg", "12 pieces"),
        Arrays.asList("Boxes", "10kg", "16 pieces"),
   );
   ValueRange body = new ValueRange()
        .setValues(values);
   UpdateValuesResponse result =
        service.spreadsheets().values().update(spreadsheetId, range, body)
                .setValueInputOption("RAW")
                .execute();
Let's see the result of above code
Writing to Multiple Ranges
If you want to write to multiple ranges, then just create another list variable and store multiple ranges into it. This time in place of update() we will use batchUpdate() function.
List<List<Object>> values = Arrays.asList(
        Arrays.asList(
                // Cell values ...
        )
        // Additional rows ...
   );
   List<ValueRange> data = new ArrayList<>();
   data.add(new ValueRange()
        .setRange(range1)
        .setValues(values));
   data.add(new ValueRange()
        .setRange(range2)
        .setValues(values));
   // Additional ranges to update ...

   BatchUpdateValuesRequest body = new BatchUpdateValuesRequest()
        .setValueInputOption("RAW")
        .setData(data);
   BatchUpdateValuesResponse result =
        service.spreadsheets().values().batchUpdate(spreadsheetId, body).execute();
Appending Values to your Spreadsheet
If you want to write data in your sheet row by row, i.e. appending new values after the old ones then you can use below code.
List<List<Object>> values = Arrays.asList(
        Arrays.asList("Bed", "60kg", "2 pieces"),
   );
   ValueRange body = new ValueRange()
        .setValues(values);
   AppendValuesResponse result =
        service.spreadsheets().values().append(spreadsheetId, range, body)
                .setValueInputOption("RAW")
                .execute();
Easy, isn't it? Feel free to comment below if you face any issue while implementing the above code.