Maven from Beginner to Expert
Have you ever gone through the frustration of not able to compile your code even after aware of the fact that code is all right, but the error is due to the missing libraries or packages on your system? this is where Maven can help you or there may be a lot of situations where Maven will become the time and energy saviour for you. But the question is what is Maven and How will it help? So today, in this article we will discuss what Maven is, why you should use it, and how you can install it, and mostly used 20 Maven commands that will take you from beginner to expert.
What is Maven?
Maven is a Yiddish word, and it means an expert or person with strong knowledge 🤓.
Maven is a software project management and comprehension tool that offers the convenience of a centralized build system for projects. Based on the concept of a project object model (POM), Maven can manage a project's build, reporting and documentation from a central piece of information. It was created by Sonatype in 2003 and is currently led by Jason van Zyl who is CTO and Founder of Sonatype, and the founder of the Apache Maven project. This is why Maven is also called Apache Maven. Maven has grown in popularity as a build tool for Java projects, since its release in 2004. It has succeeded in creating a standard directory layout for Java projects, in addition to a set of conventions for building, testing, and running projects. The project has grown into a huge, complex tool with tons of advanced features. Maven can be used in conjunction with IDE's like Eclipse, IntelliJ or with the command line.
Primarily Maven is used as a build automation tool for Java projects but what’s great about Maven is it’s not limited to any specific language or development environment. The tool is written in Java and can be used to manage projects in any language that has a Maven plug-in like C#, Ruby, Scala, and other languages projects. The build process can be referred to as the process of downloading different packages and modules you have used in your project. Maven helps in downloading the dependencies i.e. libraries or JAR files. In the old era, developers not only had to concentrate on development but also on downloading and configuring the packages from various sources and it was a tedious and time consuming process, but now with the help of Maven, IDEs like IntelliJ, Eclipse, etc can do this work for you, as a result, you can focus more on development.
As web applications become more complex, the need for a powerful dependency manager like Maven is becoming increasingly apparent. Like a lot of great open-source projects, Maven's popularity has grown mainly through word of mouth. Many developers have shared their own Maven experiences in blogs and forums, but they have rarely gone into detail about how Maven really works under the bonnet. Let's discuss Apache Maven more in detail.
How Does Maven Work?
As discussed earlier, Maven is a software project management and comprehension tool. It works by reading your project’s pom.xml (which is short for project object model) file and uses that information to build a project archive (or “project jar”) that contains all the files needed to run the project. This archive can then be deployed to a remote server, or run locally by the installation of a Maven plug-in.
Maven Build Lifecycles
Maven build lifecycles are the set of rules and tasks that Maven executes to build a project. Maven build lifecycles are different from Gradle or Ant build rules.
We’re going to take a look at how the Maven build lifecycle works. While it’s not necessarily required to know how things work under the hood to create a Maven build, understanding how the lifecycle works can help you better understand how Maven works and can help you create better builds.
A Maven build lifecycle consists of different phases. You can use these phases to perform a variety of different tasks, such as identifying which dependencies are needed for your project, compiling your code, packaging your project, and more.
The following phases are executed sequentially to complete the default Maven build lifecycle.
| Phases | Description |
|---|---|
| validate | validate the project is correct and all necessary information is available |
| compile | compile the source code of the project |
| test | test the compiled source code using a suitable unit testing framework. These tests should not require the code be packaged or deployed |
| package | take the compiled code and package it in its distributable format, such as a JAR. |
| verify | run any checks on results of integration tests to ensure quality criteria are met |
install | install the package into the local repository, for use as a dependency in other projects locally |
| deploy | done in the build environment, copies the final package to the remote repository for sharing with other developers and projects. |
It was just the default build lifecycle. Since it takes a lot of time to learn all the different build lifecycles, this article will only provide an overview of the most important ones. The building process is centered around the following three build lifecycles:
| Lifecycle | Description |
|---|---|
| Default | Default lifecycle includes the deployment of your project that covers compiling and packaging of your project. |
| Clean | Clean lifecycle covers the task of removing the temporary files like compiled classes or previous JAR files etc. from the output directory of your project. |
| Site | Site lifecycle comprises of creating documentation for your project |
POM file
To learn how maven works you first need to know about POM (project object model) files. POM file is the heart of your Maven project and the first task that Maven does is to find and read this file, these are XML files that contain the structural and configurational details of your project. By default, these files take the target directory in your project as the build directory, src/main/java as the source directory and src/test/java as the source test directory. Each project has its own pom.xml file in its root directory.
Mininum Requirements in a POM file
All things that need to be defined in pom.xml are:
| Element | Description |
|---|---|
| Project Root | It means that our project should have a root directory under which this pom.xml file will be present |
| Model Version | The version of Maven, we are using in the project because Maven itself is a framework |
| GroupId | As we have described this already, it can be the name of your company or group name etc. |
| ArtifactId | This could be your project name or project id. |
| Version | This will be the version of your project. |
An example of pom.xml file can look like this.
<project xmlns="http://maven.apache.org/POM/4.0.0"
         xmlns:xsi="http://www.w3.org/2001/XMLSchema-instance"
         xsi:schemaLocation="http://maven.apache.org/POM/4.0.0
                      http://maven.apache.org/xsd/maven-4.0.0.xsd">
    <modelVersion>4.0.0</modelVersion>

    <groupId>com.someName</groupId>
    <artifactId>yourProject</artifactId>
    <version>1.0.0</version>
</project>
Here the model version tells, Maven is using what version of POM. groupId element stands for your unique ID for your project and it can be the root java package name of your project, artifactId element refers to the name of your java project and version element tells the version of your project in case your project has multiple versions.
Maven Dependencies
One of the first tasks of the Maven is to search for the dependencies project needs, here dependencies are referring to the JAR files (libraries and modules) used by the project. These dependencies are defined in the pom.xml file. For example, you want to include a sheets package of google sheets API in your project, you can write the following code into your pom.xml file.
<dependency>
            <groupId>com.google.apis</groupId>
            <artifactId>google-api-services-sheets</artifactId>
            <version>v4-rev581-1.25.0</version>
 </dependency>
First Maven will search for this package in your local repository, you can also define your local repository in the pom.xml file, if the package is not found in the local repository, then Maven searches it in the Maven Central Repository and download it from there.
Maven Plugins
The build process of Maven has default phases and goals defined. A build cycle consists of certain phases and each phase has a sequence of goals in it but if you want to perform some extra tasks then you must add plugins for that in the pom.xml file. Below is the example for surefire plugin
The Surefire plugin verifies the execution of unit test cases by Maven and provides reports on the status of the executed test cases.
<plugin>
    <artifactId>maven-surefire-plugin</artifactId>
    <version>2.21.0</version>
    <configuration>
        <excludes>
            <exclude>DataTest.java</exclude>
        </excludes>
        <includes>
            <include>DataCheck.java</include>
        </includes>
    </configuration>
</plugin>
You need to write this code in your pom.xml file to use the surefire plugin.
Maven Project Structure
A Maven project can have sub modules in it, and each sub module need to have their pom.xml created and their parent pom.xml will be situated in the root of the project.
~
 |--module-one
     '--pom.xml
 |--pom.xml
How to Install Maven?
To use Maven, first, you need to install it in your system. As Maven is a Java based tool, you should have JDK installed in your system before you start installing Maven. If you do not know then here is a quick and straightforward guide on How to install JDK? Once you have JDK installed and configured, simply follow the following three simple steps to install Maven:
- Go to the Apache Maven Project and download the latest release of Maven binary zip archive from there.
- Extract the zip file named apache-maven into a folder of your choice.
- Add it to the environmental path of your system so it can be accessed from everywhere.
Now press Windows+R to open “Run” box and typeing cmd and then click “OK” to open command prompt and run the command mvn --version
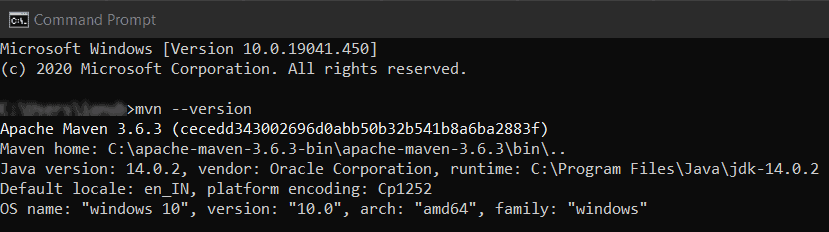
If you see output like above with the installed Maven version, you are good to go further as you have successfully installed and configured the Maven. Now it is time to learn and use Maven commands.
How to Use Maven?
To use Maven commands, go to the project directory/folder in your IDE or command prompt and run the Maven command. From here you can run any Maven command

Top Maven Commands
As you've just started out with Maven, you might be overwhelmed with all the commands and options you need to remember to be productive with Maven. So, to help make Maven feel a little more approachable, we've put together a list of some of the most commonly used Maven commands and explained what they do.
mvn clean
This command invokes the clean phase of clean LifeCycle. During the build process maven creates some files and directories, Maven clean command is used to delete them, importance of this command can be understood by an example, suppose you have renamed a class, in such case, the old compiled version of the class remained in the target/classes directory, but the clean command will delete all the old complied versions.
mvn compile
It invokes the compile phase of default LifeCycle. This command compiles the source code. This command also performs the precompile phases like generate and process the sources and resources.
mvn install
This command is used to build the project i.e. to add the artifact(s) to the local repository with the help of POM file.
mvn clean install
This command first invokes the clean phase of clean LifeCycle then invokes the install phase of default LifeCycle. It cleans the previous build and then runs the install phase for each module.
mvn test
To run the unit test of your complied source and test source files you can use mvn test command. This command invokes the test phase of default LifeCycle.
| Maven Command | Description |
|---|---|
| mvn test | run all the unit test classes |
| mvn -Dtest=Testname1 test | run a single test |
| mvn -Dtest=TestApp1,TestApp2 test | run multiple tests |
mvn verify
It will run all the tests and will analyze the results of integration tests and verify that everything is fine.
mvn clean package
It first invokes the clean phase of clean LifeCycle and then package phase of default LifeCycle. It cleans the target directory and then runs and complies the unit tests first then does the packaging of the compiled code and other files into a JAR file.
mvn validate
Validated that everything is fine in your project i.e. all dependencies are downloaded, and all necessary information is available for the build.
mvn deploy
This command is to more helpful to others than you because it deploys your code to the remote repository so that other developers can use your project.
mvn dependency:analyze
As the name depicts it will analyze the maven project and check that which dependencies are declared but not used and which are used and not declared. It will remove the unused dependencies and shorten the size of pom.xml file.
mvn dependency:tree
This command shows the dependency tree of your maven project.
mvn site:site
This command creates an HTML site structure of your project, you can see this in the target/site directory.
mvn -o package
This command is used when you are self-dependent i.e. you already have downloaded all the required JAR files and you don't want to stress maven.
mvn -q package
This command will only show the results of test cases and errors. It is also called quite mode 🤫.
mvn -x package
This command will run the build in the debug mode it means all the debug messages will be shown in the console.
mvn -v package
This command will first display the version of maven and then start the normal build process.
mvn -T 4 package
This command is used when you have to run the build for different modules in your project parallelly.
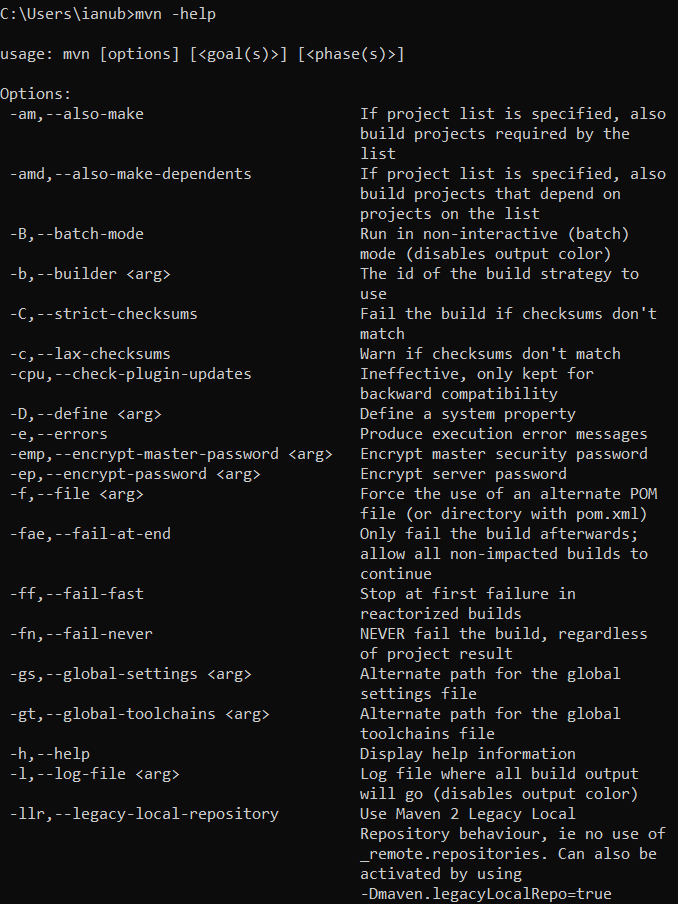
mvn -help
It will print all available maven options with their description.