The Ultimate Git Cheat Sheet
Version Control is a system that keeps a record of the changes made to files along with the addition and removal of files over time so that you can recall or reverse back to specific versions later. Most widely used version control system in the present time is Git. Git is a faster, more powerful version control system than the mercurial. The father of Linux kernel Linus Torvalds invented Git in 2005 to maintain Linux kernel project. Today, Git has become the most stable version control open-source project in the world. Git is extremely useful for developers; they can not only maintain the record of changes they have done in the source code but also collaborate with fellow developers easily. Consequently, Git is also called DVCS (Distributed Version Control System) as it can make the source code distributed and available for others. In other words, Git provides a copy of code to the developers; they can work and make changes in it and Git will hold a record of their changes.
Git has so numerous features, and git commands are the only option to utilize all these features and make the most of Git. Memorizing all Git commands is a tough task, and to make this tough task simple I have created this Ultimate Git Cheat Sheet. So, before diving into Git commands, let's just take a brief knowledge of commonly used Git terms.
Commonly Used Git Terms
I always say it is better to understand the basic terminologies before a run to "how it works".
Repository
In Git, the directory of your project is represented by the repository. Git tracks all the files in the repository. All the files in the repository can then be uploaded to GitHub and shared with other people either publicly or privately. In the context of Git and GitHub can be two types of repositories.
- Local repositories: Refers to the directory in your system where you have your whole project.
- Remote repositories: A directory containing your project but on a cloud platform where it can be accessible to others.
Commit
When a developer makes a change in the code and he wants that change to be integrated into the project then he commits his code on Git. A unique id or SHA is also generated for each commit, and that is how all commits are distinguished from each other. His commit represents the version of code he is working on. So, in short, a different commit represents the different version of code and they can be identified with the help of their unique ID or SHA.
Actual commit IDs are forty hexadecimal characters that specify a 160-bit SHA-1 hash but for the sake of simplicity, you will often see shorthand version which is only the first seven characters of the actual commit ID.
In the above image, different commits with their shorthand version of commit ID are shown. These different commits are representing different developed versions of the code.
Staging Area
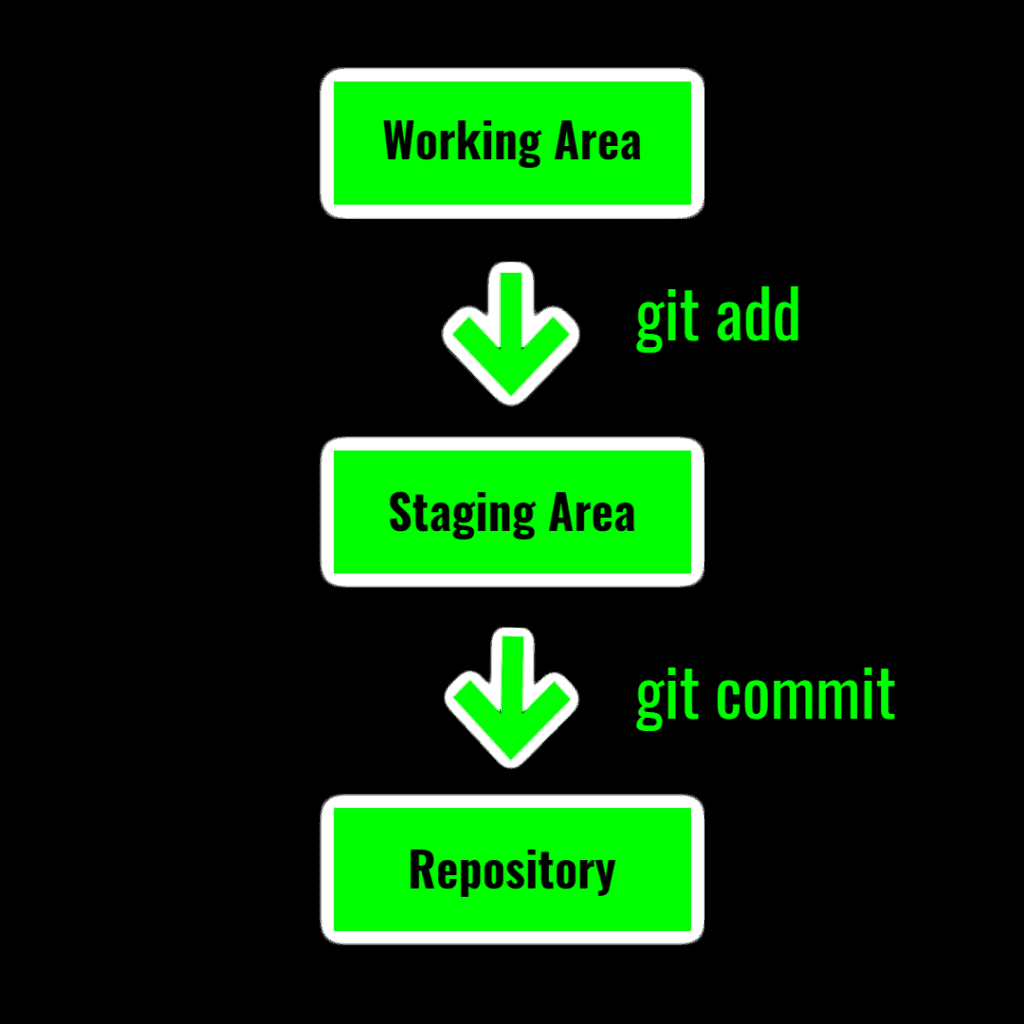
There can be two types of files when you are using Git, first which are being tracked by Git, and second, which are not being tracked by Git. You can commit only tracked files. Before the commit, all tracked files stay in the staging area.
Branches
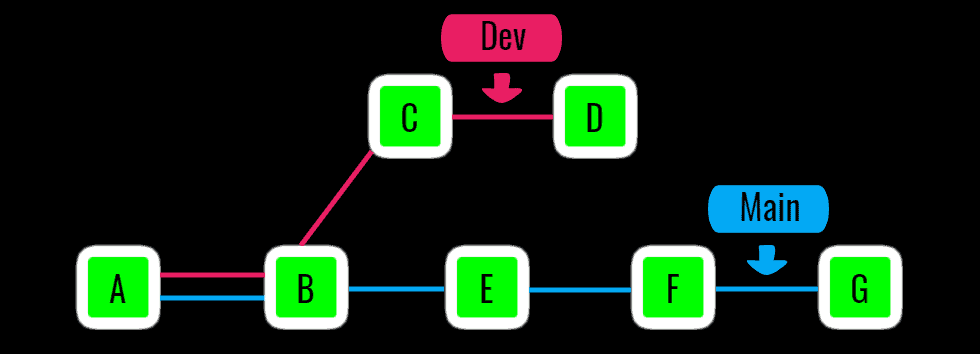
Just like a tree can have multiple branches, leaves and fruits, Git creates a tree-like structure of your development process. Git branches represent a work done in a specific direction. You can create a copy of your main source code, name it and start working for a specific feature on that copy. Once you are done with your goal, you can merge the changes done in this copy to your main source code. By default, Git configures your main source code as the main branch.
Above image represents branching in Git. There are two branches in the above figure. The first branch is the Main branch, which is represented with blue colour and the second branch is the Dev branch, which is represented with pink colour, Dev branch is created at commit B.
Merge
Once you have made changes and done development in a specific branch, you would want to integrate those changes in the main source code. Process of combining and integrating changes from one branch to another branch is called merge.
Head
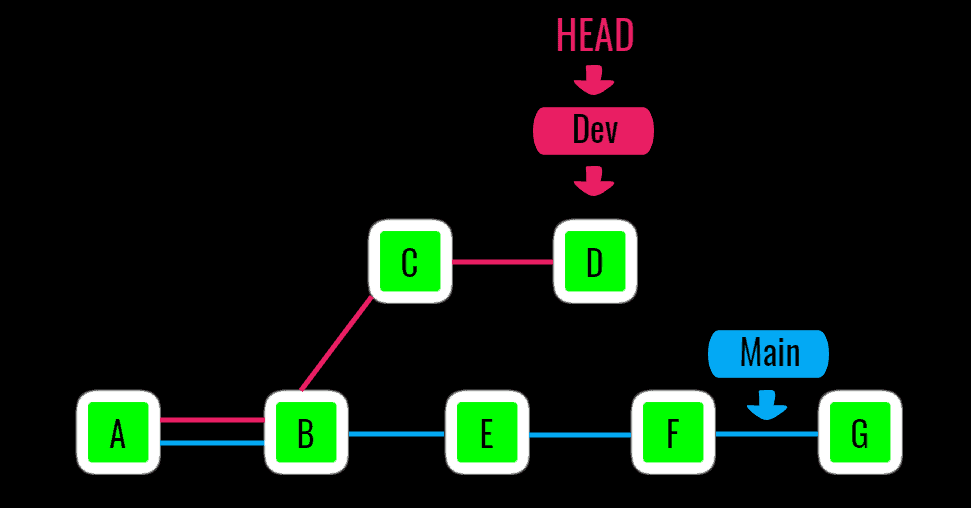
Head represents the last commit of the current branch. It is simply a pointer to the latest commit, in other words, head points to the current version of the code in the corresponding branch.
Difference Between Git and GitHub
I often see people get confused between Git and GitHub, it is normal to get confused considering GitHub's popularity. But are they really same? Sometimes people take Git and GitHub as same things, but the fact is there is a stark difference between them. Let's discuss both to understand this better.
Git
Nothing more and nothing less Git is just a version control system and helps programmers to manage and maintain code version histories while collaborating with the fellow programmers.
GitHub
GitHub is an IT service management company whose parent company is Microsoft Corporation. GitHub is a cloud-based hosting service that provides an online platform where you can host your projects (git repositories), do collaborations with others, manage your development with version controlling through a web-based graphical interface and with the help of Git. You can upload your project in an online GitHub repository. This repository is called remote repository and you and your fellow developers can access it through Git from your local system. So, in short, using GitHub, you can share your file system like files, documents, etc. with others, access another user’s file system, and store remote files and projects of other developers on your local system.
In this article, we will learn about all Git commands that will help you to host and maintain your project on Git.
Commands in Git
Now that you have understood the basic terminologies of Git and differences between Git and GitHub, now it is time to learn all useful commands of Git. Before trying all these commands, make sure you have installed Git into the system. If you do not have git installed into your system just click here to download and install it. Once you have installed it, open the Git Bash or Terminal to use any Git command.
git config
After the Git installation, some basic configurations should be done like setting default text editor for the Git, setting the username and email for Git etc. You can use the git config command. There are three types of these configurations
- --local: In this level, Git configurations will be limited to the concerned repository.
- --global: Global level Git configurations are applied to an operating system.
- --system: This level Git configurations will be applicable to all users on an entire system i.e. all operating systems and repositories.
You can set many configurations with git config command.
Set default text editor for Git
Some Git commands require a text editor for further input. In this case, you would want to set your desired editor as a default text editor for Git that can be done by using the following commands.
Windows
Atom Editor
git config --global core.editor "C:/Users/_USERNAME_/AppData/Local/atom/app-_VERSION_/atom.exe"Notepad++
git config --global core.editor "'C:/Program Files/Notepad++/notepad++.exe' -multiInst -notabbar -nosession -noPlugin"Sublime
git config --global core.editor "'C:/Program Files/Sublime text 3/subl.exe' -w"Note: If you are on a 32bit operating system, replace
Program FileswithProgram Files (x86)
Visual Code
git config --global core.editor "code --wait"Linux
Atom Editor
git config --global core.editor "atom --wait"Sublime
git config --global core.editor "subl -n -w"
Nano
git config --global core.editor "nano"Mac
Atom
git config --global core.editor "atom --wait"Sublime
git config --global core.editor "subl -n -w"TextMate
git config --global core.editor "mate -w"Set the email address for Git
git config --global user.email "Your email address"Set the username for Git
git config --global user.name "Your username"git init
This command will make your project directory, a Git repository. This represents a local repository. This command creates
- A .git subdirectory
- Adds all necessary Git metadata like objects, refs, and template files.
- The HEAD file that points to the latest commit in the current branch.
git initgit add
When you modify an existing file or create a new file in your project, and you want Git to track it then you can use git add command. This command will put your file in the Git index that is also called the staging area.
Add all the unstaged files to the staging area
git add .Add only one file to the staging area
git add <filename>Add multiple files to the staging area, just add multiple filenames with spaces
git add <filename 1> <filename 2>git commit
After adding files and changes to the staging area using git add command, the git commit command is used to record the changes from the staged area to the local repository. When you do a commit, Git expects you to enter a message for the commit. This message is extremely useful because it represents the work done in that particular commit.
Commit with single line message
git commit -m "Your message"Commit with multi-lines message (Uses default text editor to message input)
git commitgit status
As the name says, git status is used to check files are changed and not yet added to the staging area. It shows the status of your local repository by listing out the modified, new, and deleted files of the local repository. In the status, it shows a list of files in two colours red and green.
- Red colour represents the files that are not yet added to the staging area or in other words files that are not being tracked by Git.
- Green colour represents the files that are added to the staging area using the git add command.
To know the status of single file
git status <file name>To know the status of all files
git status .or
git statusgit branch
Branching is one of the most powerful features of Git and for branching operations, git branch command is used.
List all the branches of your git repository
git branchAdd/Create a new branch
git branch <branch name>Delete a branch in safe mode. Safe mode means it will prevent you to delete the branch if it has unmerged changes.
git branch -d <branch name>If you have decided to delete the branch anyhow
git branch -D <branch name>Change the branch name, this will be applicable to the current branch.
git branch -m <new name>git checkout
Switch branches or move from one branch to another branch by using the git checkout the command
git checkout <branch name>git merge
git merge command will merge the changes of another branch into your current branch. When you use git merge, Git automatically creates a new commit to represent the merging step.
git merge <branch name> Above command means that bring all changes from the <branch name> and merge them to the current (checked out) branch.
git remote
git remote command lets you make a connection between your local repository and the remote repository.
git remote add origin "Link to your remote repository"Here origin is referring to the name of your remote repository. It is just a convention to use origin as name, you can use any name here. This name is a short name for the remote repository. This name can be used instead of that repository's original URL to make referencing much easier.
To check which remote repository is added as remote.
git remote -vgit clone
A remote repository can be cloned/copied using the git clone command. This command fetches the remote repository and creates an exact same local version of that remote repository. The local version of the repository contains all files, branches along with the commit history of the remote repository.
git clone <Remote_URL>git log
This command will give you the logs of the Git history. The git log command gives you all the information of commits, like commit time, commit author, changes that commit possess etc. Moreover, this command is used in different ways for getting results in different formats
Get all the logs
git log or
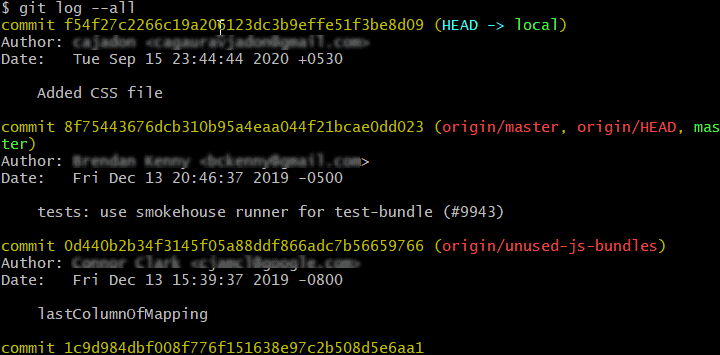
git log --allThis will give you results like this
Firstly, it will show you the commit ID, Secondly Author name (who did the commit) then the date and time of the commit and in the end, it will show you the commit message.
Moreover, you can tell Git to show only a fix number of commits by giving the number of commits as an argument like this
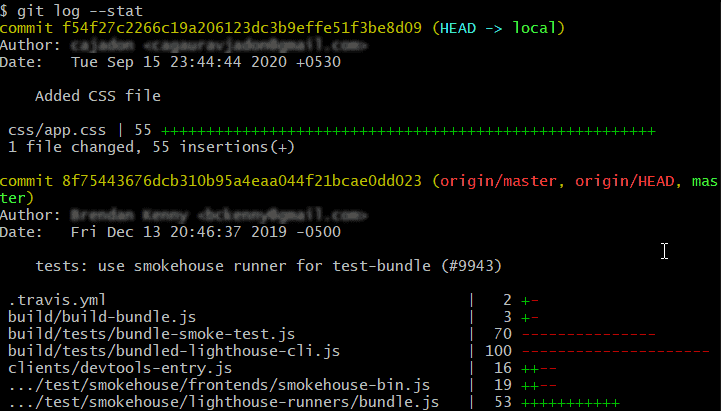
git log -3Get the details of changes in each commit
git log --statShorten the log details
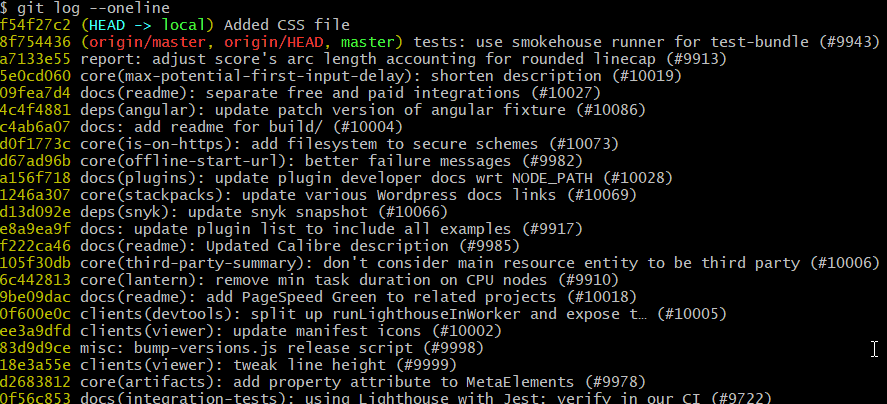
git log --onelineThis will shorten the commit IDs and display only commit message.
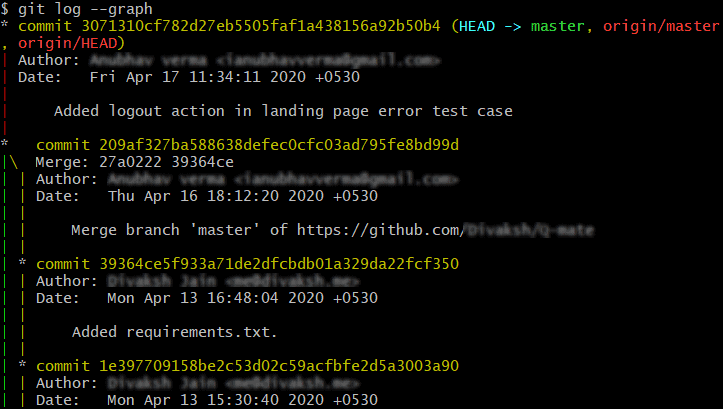
Get a graphical representation
git log command can also show you a graphical representation of your Git history.
Shorten the graph
git log --oneline --graphgit stash
git stash command can save untracked files (your present work) into temporary storage and allows you to work on a different part of the code. Let me make this explanation a bit easier with the help of a real-life situation.
Suppose you are working on a file, and in the middle of it you got to know that is a bug in existing code which must be resolved as soon as possible. Now, you are in a situation where you can neither want to lose your present code nor you can commit incomplete code. git stash comes here for the rescue. It will save untracked files into a temporary space and set the HEAD on the last commit. Now you can work on existing code and resolve the bug, make a commit and after that regain your stashed changes and continue your work where you left off.
Stash your changes
git stashSave a stash message
git stash save "Your message"Stash untracked files
git stash save -uSee the list of stashes you have made
git stash listGet back your stashed work
git stash apply stash@{1}As git makes a list of stashes you can apply any stash from that list by specifying the number of it like stash@{Index}.
Pop a stash
If you do this git will apply the stash and delete it from the list.
git stash pop stash@{0}git push
Git push command is used to push your work from the local repository to the remote repository.
git push <Name of remote repository> <Name of the branch on the remote repository>So, it will look like this in common
git push origin mainThis command creates a copy of your local Git tree structure on your remote repository.
git fetch
git fetch command downloads the data from the remote repository to your local repository but it does not integrate it with your current data. It puts it into the staging index.
git fetch <Name of remote repository> git pull
Git pull downloads the data from the remote repository and integrate it with your local repository data. It is one step ahead of the command git fetch.
git pull <Name of remote repository> <Branch name of the remote repository>For example,
git pull origin maingit reset
Git reset command will reset your changes. By reset, I mean that it will take back you to the previous commits. Just to clarify this command resets the head. You can decide onto which commit you to want to travel back, for example,
Go to the last commit
git reset --hard HEAD Go to the commit just before your current head
git reset --hard HEAD^Go to the two commits before the current head
git reset --hard HEAD^2Did you notice the --hard option after the git reset? To clarify, if you use the --soft option after the git reset then Git will put the changes of commits which were reset into the staging area, and you can commit them again. But if you use the --hard option then Git will throw the changes into the trash.
In simple words, think of --soft as an "undo commit" feature, which only removes the commit and keeps your changes safe, on the other hand --hard will remove your commit along with the changes you have made in the commit.
Bonus Git Commands to Boost Productivity
We have learned all commands that will help in basic operations of Git, now, it's time to go advance and learn some tricks that can boost your productivity.
Autocorrection for Git Commands
Typos are bound to happen but what if the wrong typed command automatically gets fixed? Yes, Git has command auto-correction feature too. No matter you are in hurry or unaware of the correct spelling of the command, Git suggests you the commands that are the nearest match to your typos. But you can allow Git to use the first suggestion in place of the typo automatically. For this, you just need to run the below command once.
git config --global help.autocorrect 1View a File from another Branch
If you don't know this shortcut, you will have to checkout to the branch and then only you will be able to access the file, but there is a command git show to access any file from any branch.
git show branchname:filenameCount the number of Commits
We can know the total number of commits we have done in our project by using the git rev-list command, which is
git rev-list --all --countto know commit counts of a particular branch use can use the branch name without --all like this
git rev-list –count mainI have tried to cover all commonly used Git commands in Ultimate Git Cheat Sheet, but if you think I have missed something or find any command difficult to understand feel free to let me know in the comment section below.
